07 July, 2012

Banana rum raisin ice cream


 Haagen-Dazs Rum Raisin is my favorite ice cream.  I saw this recipe on Martha Stewart's site a few months ago and since I've seen it on a few blogs.  It's simply devine!  It's decadent and wonderful and best of all - easy! 

Banana Rum Raisin Ice Cream
3/4 cup dark rum (I used regular Bacardi)
3/4 cup golden raisins
1/2 cup sugar
4 soft-ripe medium bananas, coarsely chopped
1 can (14 ounces) sweetened condensed milk
2 cups cold heavy cream

toasted coconut (optional)
  • In a medium saucepan, combine rum, raisins, and sugar. Bring to a boil over medium-high, remove from heat, and let cool completely, 30 minutes.
  • In a food processor, combine bananas and condensed milk and process until smooth, 2 minutes. In a large bowl, using an electric mixer, beat cream on high until stiff peaks form, 2 to 3 minutes. With a rubber spatula, gently fold banana mixture into whipped cream. Fold in rum-raisin mixture. Pour into a 5-by-9-inch loaf pan, cover with plastic, and freeze until firm, about 8 hours (or covered, up to 1 week).

24 June, 2012

The little oven that could!

When it's 101 degrees outside and you're craving some brownies, but you can't stand the heat generated from the heat monster known as your oven, utilize your toaster oven!  In the summer time I use my toaster oven for most all of my baking. I use it to heat up pizzas, hot sandwiches, and leftovers for my boys, but I also use it to make brownies or small cakes.  The heat can sometimes be a bit uneven, but it gets the job done.  I also make things like baked chicken or cubed steak n gravy for supper in the little oven that could. 


Here's a good brownie recipe:
  • 1/2 cup sugar 
  • 3 T. butter
  • 2 T. water
  • 1 1/2 cups chocolate chips (semi-sweet)
  • 2 eggs
  • 1/2 t. vanilla extract
  • 2/3 c.  flour
  • 1/4 t. baking soda
  • 1/2 t. salt

  • Preheat the oven to 325. Butter an 8x8 inch square pan.
  • In a medium saucepan, combine the sugar, butter and water. Cook over medium heat until boiling. Remove from heat and stir in chocolate chips until melted and smooth. Mix in the eggs and vanilla. Combine the flour, baking soda and salt; stir into the chocolate mixture. Spread evenly into the prepared pan. Bake for 25 to 30 minutes in the preheated oven, until brownies set up. Don't overbake! Cool before cutting.

14 June, 2012

basil -n- anchovy pesto


This week found me perusing the internet for ways to use up my ever bountiful basil that is flourishing from what started with one wee little plant.  I love pesto and I do make a few batches of that each summer.  I was really excited when I came across a few similar recipes for a pesto recipe using basil and another one of my favorite ingredients---wait for it............flavor packed anchovies!  If you're not a fan of the salty little fishes... have you really ever tried 'em? They are one of my favorite ingredients to use in pasta sauces, salads, and condiment type sauces like this one. I would encourage you to start small and try incorporating small amounts in recipes that call for them or are compatible with their flavors.  I experimented with a few different pesto recipes and came up with this delicious fusion.  So it's basil -n- anchovy pesto!  


Basil-n-anchovy pesto:
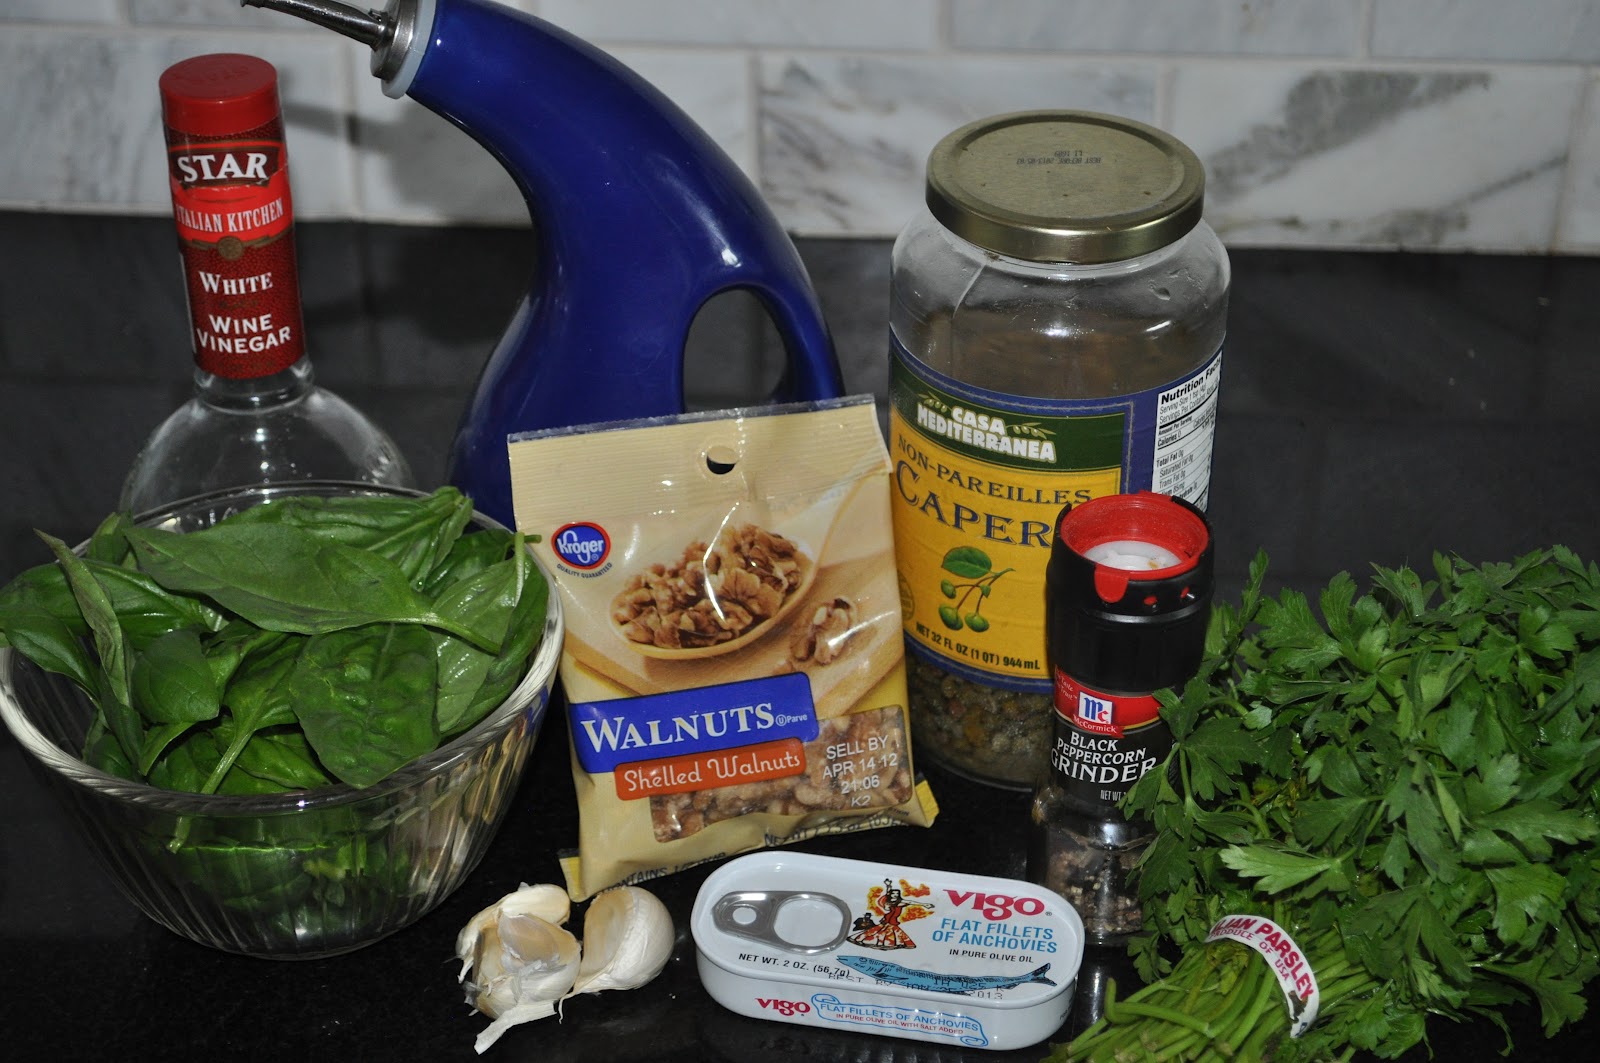
4 cloves garlic, peeled
2 cups loosely packed fresh basil leaves
1/4 cup pine nuts or walnuts, toasted
1/2 cup fresh Italian parsley leaves
1 T. drained capers
2 T. white wine vinegar
1-2 T. Progresso Italian breadcrumbs
8-10 anchovy fillets, drained (don't throw out the oil in the tin)
1 T. anchovy oil from the tin
fresh ground pepper
1/2 to 3/4 cup olive oil 

Clean and dry your herbs. Combine everything in a food processor EXCEPT the olive oil.  Pour olive oil in slowly until you get the texture you like.  Taste and adjust ingredients to you liking.  I added more anchovies and anchovy oil to mine but it's up to your taste.

My son who is an anchovy lover like me has asked me to make homemade pizzas using this as the pizza sauce.  His favorite pizza is pepperoni, jalapeno, and anchovy! Will document using this as pizza sauce in a future post.

11 June, 2012

Rachael Ray knives

 I recently received the Rachael Ray knives I ordered!  I have to say I am really enjoying them so far!  Here's the specs on R.R.'s 10 piece knife set- 

10-piece set includes 3-1/2-inch paring, 5-inch boning, 6-inch serrated utility, 7-inch East/West, 8-inch bread, 8-inch cook's, and 8-inch carving knives
Also includes carving fork, kitchen shears, and handsome bamboo hardwood block
Single-piece German stainless-steel construction with forged bolster and strong tang
Bright orange synthetic handles with built-in antimicrobial inhibitors
Hand wash; limited lifetime warranty


I researched knives for a couple months before making this purchase. My old knife set was ancient.  If my memory serves me correctly the hubs ordered them for me..maybe..10 years ago off of an infomercial! Ha!  They weren't the greatest quality, but they've definitely served their purpose in my busy kitchen over the years.
 I fully intended to go with a Henckels or Wustof set.  I even had the green light from upper finance (a.k.a. my husband) to make the purchase.  As I researched though, I found so many great reviews of these R.R. knives.  First off, I love the cushy rubber handles which are antimicrobial  They make it easy to grip when your hands are wet.  They're nice and solid in their construction, and supa-sharp.  When I found comparable Henckels or Wustof, the R.R.'s set seemed like a no brainer. I decided to take a chance on a knife set with great reviews and have some leftover dough for something else. I figured worse case scenario I wouldn't like them and I'd only have spend $120 and I'd use them anyway for a couple years.  So as of now I'm really digging this Rachael Ray set of 10 knives.  I got mine from Amazon.  They had the best price I found, and shipping was free! Here's a link to where you can buy if interested:
http://www.amazon.com/gp/product/B000OYMAO6/ref=s9_simh_gw_p79_d0_g79_i1?pf_rd_m=ATVPDKIKX0DER&pf_rd_s=center-2&pf_rd_r=0Q10PXTRNFWBCC2RK1BR&pf_rd_t=101&pf_rd_p=470938631&pf_rd_i=507846


02 June, 2012

Ceiling fans (a necessary evil?)

Having ceiling fans in the south is not only a nicety, it's a necessity.  So glad that over the years fan designers have stepped up and improved the looks of these formally aesthetically unpleasing eyesores.  Those ignorant designers who won't hang a ceiling fan (especially in the warmer southern regions) are not being sensible in the least.   A room can look good all day long, but if you're sweltering in it, no one will want to hang out there.  Yes, we'd all rather see a gorgeous light fixture or chandelier above our heads, but a ceiling fan in all it's wonderful practicality (beautiful breezes blowing in our faces) doesn't have to be ugly.

This first picture above is of a fan (three blade) that we bought my oldest son.  I'm not giving the manufacturer or name because it was a useless fan.  Three blades DON'T do the job.  The blades were also shorter.  My son loved the look, but unfortunately we ended up replacing it a few months later. I'm just saying beware of shorter, 3 bladed fans like these.


TEOLO FAN from Harbor Breeze (above top pic the actual fan in my house, bottom pic is from Lowes website.
This is the fan we ended up putting in our master bedroom.  We also replaced our son's three blade with this one and put another in our upstairs bonus room.  I love the simple, modern look of it. And it and puts out a wonderful amount of air very quietly.


URBANIA FAN from Harbor Breeze.  This is the fan we got for our living room.  It looks tons better in person.  Again, I like the simple design, and the breezes produced from it's FIVE, 54" blades makes my family happy in the heat of summer.

So that's the ceiling fan situation at our house.  Putting up a ceiling fan doesn't have to jeopardize your style. There's lots of great options out there.  


23 May, 2012

teaspoons and cinnamon

 I have a large silverware drawer with probably 3 or 4 different sets of flatware in it.  If I'm having company for dinner or setting a formal table I will take notice of matching patterns, but in our normal day to day routine we just grab and eat.  I thought it was interesting though to take note of the differences in these two spoons.  The top spoon is from a set we used when I was growing up in my parent's house.  When I got married my mom gave us a few things to start and I still have a spoon or two left.  The bottom spoon is from my newest set.  Although they are both teaspoons the difference in size is great.  I don't know if that says something about the modern design, or how much bigger our bites are these days.  hmmm...something to ponder.


 I love McCormick's black pepper grinders, but have you seen their cinnamon grinders?  I love using it for a really fresh cinnamon taste in recipes, over toast, and in my big bowl of oatmeal in the morning.  


22 May, 2012

Corn on the grill

Corn on the grill is Crazy good!! Some folks put it in foil.  Some like to grill it in the husks.  I (or the hubs) like to go full-fire and just hover it right above the coals. Hickory coals that is!  You've got to try it.  It's SO very scrumptious!!  

Corn ears, husked and cleaned
extra virgin olive oil
Old Bay or Cajun seasoning
prepared grill (hickory charcoal preferably)
softened butter

Prepare your grill and heat to medium heat. We usually put the corn on while we're waiting for the coals to be hotter for the meat we're cooking.  Husk and clean your ears of corn.  Drizzle some olive oil over and rub it all over the corn. Sprinkle with Old Bay or some spicy cajun, or anything you like really.  Place the corn on the grill and start turning it to get the even charring all around.  It'll take about 15-20 min.  Don't overcook it or may become mushy.  When you're done serve it along with some softened butter and enjoy.  Oh. Yum.

19 May, 2012

saltine toffee

This is such an oldie, but such a goodie!  I hadn't made these in years.  I saw the recipe again today and I and remembered how easy and delicious they are. Most all recipes for these call for light brown sugar.  I use dark brown sugar for most every recipe that calls for brown sugar.  It's just the right thing to do in my opinion. You can also use milk chocolate instead of semi-sweet if you'd like. These are extremely addictive so consider yourself forewarned.  


saltine crackers (i like Keebler Zesta)  to cover large jelly roll pan
1 c. butter
  • 1 cup brown sugar (dark or light)
  • 1- 1 1/2 c.  semisweet chocolate chips
  • non stick spray

  • Heat the oven to 425.
Line the jelly-roll pan with aluminum foil, spray with nonstick spray and arrange the saltines in a single layer.


In a saucepan, melt the butter and brown sugar together boiling for about 5 minutes. Remove from the heat and spread over the crackers, try to cover them all evenly.
Place into the oven and bake for 2 to 4 minutes, or until just bubbly, watch 'em carefully.  Remove and pour the chocolate chips over the crackers. When the chips start to melt, spread them over the crackers with a knife or spatula.


Put  the pan to the freezer for about 20 min. until they set up.  They will form one big sheet. Break 'em up into pieces.  Yum!


12 May, 2012

Sliders


Sliders make for a quick dinner on busy nights.  My boys like them because they look a little like White Castle, but they taste so much better.  I like to buy the dinner rolls in the bakery section of the market (usually Costco) for the buns.

Sliders:
Ground chuck (80/20) 2 pounds for a 9 x 13 pan
dehydrated onions
Lawry's seasoning salt
6 slices of Kraft American cheese
Sliced dill pickles
bakery dinner rolls
Sprinkle dried minced onion (to your taste) on the bottom of a 9 x 13 pan. 
Press ground chuck into pan, on top of onions until it completely covers the bottom.  Use two pounds of ground chuck if you are using a 9 x 13 pan or 2-1/2 pounds of ground chuck if you are using a 10 x 15 pan.  Sprinkle the meat with seasoning salt.
Place in a 400 degree oven for 25 minutes. Use an 80/20 mixture or you'll get dry burgers. 
The meat will shrink in the oven.  After 25 minutes remove and cover with six slices of cheese.  Place meat back in the oven for two minutes until the cheese is melted.
With a pizza cutter or a knife, slice the meat into as many square pieces as you have rolls.
Place the meat in between the bun with some of the onion and pop on a few dill pickles.  And if you live in my house...lots of mustard.
enjoy!

25 April, 2012

Tasty Chicken Stir fry

Stir fry is a mainstay at our house.  I usually make it in some form at least once a week.  I found this delicious stir fry recipe and it would work with just about any meat and veggie combo.  My family loves chicken thighs and prefer them to white meat.  
Another thing I found helpful is the prepackaged fresh veggies at Kroger.  I usually balk at those packages thinking 'why would anyone do that' but when I figured how much it would be be to purchase each veggie separately and chop it up I decided to try it.  The package stays "Asian Stir fry" and it's got peppers, carrots, celery, mushrooms, sugar snap peas, zucchini, and cabbage.  I was impressed and it saved me a lot of time this evening.


  • 1 tablespoon white wine
  • 1 tablespoon soy sauce
  • 1 teaspoon brown sugar
  • 3 medium green onions, finely chopped (white parts only)
  • 1 pound skinless, boneless chicken thighs, cut up
  •  
  • 1 tablespoon white vinegar
  • 2 tablespoons rice vinegar
  • 1 tablespoon soy sauce, or to taste
  • 1 tablespoon Asian chili paste
  • 1 tablespoon sesame oil
  • 2 tablespoons brown sugar
  • 2 teaspoons ketchup
  • 2 tablespoons white wine
  • 4 cloves garlic, minced
  •  
  • oil for wok or skillet
  • 1 tablespoon cornstarch
  • 2 tablespoons water

  • salt and ground black pepper to taste
  • 1/4 cup chopped green onion tops
  • 4 cups cooked white rice

  • Whisk together 1 tablespoon white wine, 1 tablespoon soy sauce, 1 teaspoon brown sugar, and finely chopped green onion.Stir in chicken pieces to coat. Cover and refrigerate for 1 hour.Combine white vinegar, rice vinegar, 1 tablespoon soy sauce,  chile paste, sesame oil, 2 tablespoons brown sugar, ketchup, 2 tablespoon white wine, and garlic in a bowl. Whisk thoroughly; set aside.Mix cornstarch with cold water in a small bowl.Heat oil in a heavy duty, nonstick skillet over high heat. Stir in chicken; cook and stir until chicken begins to brown, about 2 minutesStir in the vegetable; cook for 2-3 more minutes. Stir in vinegar mixture; cook and stir until vegetables are tender and chicken is no longer pink in the center, about 2 minutes. Stir in cornstarch mixture until sauce is thickened, about 30 seconds; remove from heat. Season with salt and pepper if needed. Stir in green onion tops. Serve over white rice.

24 April, 2012

NaNa Cake

I usually have some overly ripe bananas sitting on my counter at some point in the week. I like to use them for baking, but when banana bread seems too run-of-the-mill, I like to make a fresh Nana Cake.  It's moist, delicious, and tastes like it must've been way more complicated than it actually was.  This cake is better the day after you bake it. 


NaNa Cake 

1 c. butter, softened
1 c. sugar
2 large eggs (preferably at room temperature)
1 c. mashed ripe bananas
1 3/4 c. flour
1/4 t. salt
1 t. baking soda
1/3 c. buttermilk
1 t. vanilla

Preheat the oven to 350 degrees.  Grease and flour the bottom and sides of two cake pans. Beat together butter and sugar in large bowl until light and fluffy.  Add eggs, one at a time, beating well after each addition.  Add banana, mixing until incorporated.  Stir together the flour, salt, and soda in a small bowl.  With mixer on low, alternately mix flour in fourths and buttermilk in thirds into the batter beginning and ending w/ flour.  Add vanilla and beat 1 minute on medium.  Divide into prepared pans and bake at 350 for 30-35 minutes until cake is springy and knife comes out clean.  Cool completely and then frost with cream cheese frosting.
Cream cheese frosting:
8 oz. cream cheese, softened
1/2 c. butter, softened
2 c. or more powdered sugar (depends on how thick you like your frosting)
1 t. vanilla
Cream the cream cheese and butter. Beat in the two cups of powdered sugar and vanilla.  

04 April, 2012

Light and lovely Roasted Chicken breasts & Veggie Feast in 1 Pan!!


Roasted chicken is one of tastiest and simple meals.  There is really nothing more basic yet so mouthwatering.  I came across this recipe using chicken breasts instead of a whole chicken, and some different vegetables and spices than I normally use in my traditional roast chicken. I so wish the hubs was home to enjoy this with us.  He is slaving working away down in Brasil (3rd week in a row) taking one for the team (as his boss likes to say)... :( no comment.  I can't wait to see him next week.  So... turning my oven on in these 85+ degree temps was a risk, but desiring roast chicken with veggies, being able to experiment with new ingredients, and my college boy home for dinner (a rarity) I decided to go for it.  What's a little sweat in the name of a delicious roasted chicken dinner?
**This dish is more figure friendly than my whole roasted chicken. Of course it's not as decadent as whole roast chicken, but we're saving calories.  It's Light and lovely!


 Roasted Chicken breasts & Veggie feast in 1 pan:
Chicken:
4 boneless skinless chicken breasts
1/2 c. dry white wine (use what you drink)
1/4 c. extra virgin olive oil
2 t. dried oregano
2 garlic cloves, minced
1/2 t. kosher salt
1/4-1/2 t. crushed red hot pepper
Veg:
9 little red potatoes or 4-5 russet, scrubbed and cut in quarters
3 large carrots, cut in 1/2" circles
1 T. extra virgin olive oil
4 ripe Roma tomatoes cut into 1/2" slices
2 onions,  sliced 1/4" thick
1 t. kosher salt
freshly ground black pepper
fresh chopped parsley
Preheat your oven to 375. Get out your roasting pan out and put a little oil in the bottom. 
Take out your chicken breasts and pound them to a quarter inch thickness.  Get a glass 9x13 and mix the marinade-- wine, oil, oregano, garlic, salt, and red pepper and whisk it together.  Add your pounded chicken to the marinade and refrigerate between 1-1 1/2 hours.  No longer than 1 1/2 hours. 
while your chicken marinates cut up your potatoes and carrots and toss with the oil.  Place in roaster pan and put in preheated oven for 45 minutes covered with foil.  Take the foil off and leave in another 15 minutes.  Take out the roaster pan and add the tomatoes, onions, salt, and pepper and toss it together.  Take your marinated chicken and place on top of the veggies.  Pour the marinade from the chicken over all.  Place back in the oven for 25 minutes or until the chicken is done.  Sprinkle with parsley and serve.  I served it with a salad and crusty bread. . .really good.  

15 March, 2012

P.B. & oatmeal cookies

Yes, it has been a very long time since I've posted.  Our family has been overseas with my husband while he works. We are very excited to be home.  God bless America!!!  I'll be posting a few Brazilian recipes and other posts in the near future. 
Just being back in the states at a grocery store where I can read labels and find familiar ingredients feels like a gift.  I will never under appreciate my Kitchen Aid mixer again!  I made some chocolate chip cookies there by hand (after finally finding baking soda and the real butter).  They weren't bad but definitely not as good as the ones I make in my own kitchen.  The quality of appliances there is poor compared to here in the states and things cost about 3-4 times as much as do they here.  
I've got a lot of peanut butter in my cupboards so I wanted to bake.  Peanut butter cookies are my favorite.  I found this recipe with the addition of oatmeal that I thought sounded really great.  They are!!  I also added some nestle morsels to half the dough since my kids love 'em.  I think I'll always make these now instead of just plain oatmeal.  Give 'em a try.  
I doubled the recipe with great results.
Peanut butter & oatmeal cookies:
  • 1 cup butter, softened
  • 1 cup packed brown sugar
  • 3/4 cup white sugar
  • 1 cup peanut butter
  • 2 eggs
  • 1 1/2 cups all-purpose flour
  • 2 teaspoons baking soda
  • 1 teaspoon salt
  • 1 cup quick-cooking oats
  • 1- 1 1/2 c. chocolate chips (optional)
  • Preheat oven to 350 degrees F (175 degrees C).
  • In a large bowl, cream together shortening, butter, brown sugar, white sugar, and peanut butter until smooth. Beat in the eggs one at a time until well blended. Combine the flour, baking soda, and salt; stir into the creamed mixture. Mix in the oats until just combined. Drop by teaspoonfuls onto cookie sheets.
  • Bake for 10 to 15 minutes in the preheated oven, or until just light brown. Don't over-bake. Cool and store in an airtight container.